
Securing the Network
Overview
The AnyLog Network is using 3 mechanisms to make the network secure: 1) Using a 3rd party Overlay Network. An example of an overlay network is Nebula. 2) Securing the messages transferred between AnyLog nodes using Key-Based Authentication (Public Key Authentication). 3) Securing messages transferred between 3rd parties applications and AnyLog nodes using certificates and passwords.
Deploying a 3rd party overlay network
The overlay network allows for:
a) Authorize the nodes participating in the overlay network.
b) Identify the members of the network by a unique IP and Port.
c) Resolve network routing issues.
d) Encrypted messaging between the member nodes.
Refer to the 3rd party vendor manual for installation and configuration instructions.
Key-Based Authentication
The Key-Based Authentication enables the following:
- Each node is assigned with a private key and a public key^.
- A message from a node to a peer is signed by the private key.
- A peer node receiving a message authenticates the sender using the public key.
- If the sender is authenticated, the sender permissions are validated using the relevant policies.
- A message is processed on the receiver node, if the sender is authenticated, and the sender is permitted to sent messages of that type.
^Note: A private key and a public key can be assigned to users - it allows for administrators to operate on the node’s CLI using their assigned permissions which may be less restrictive compared to the permissions assigned to the node.
The relevant AnyLog commands are detailed in the section Node Authentication.
Key-Based-Authentication deployment example
The example below demonstrates the following:
a) Assigning keys to nodes and users as needed.
b) Defining the policies that determine user permissions.
c) Assigning nodes and users to the policies that determine their permissions.
Definitions
- A member policy - a policy that provides information on a member node or a user. The policy includes the public key assigned to the member.
- A permission policy - a policy that lists permitted and restricted commands and permitted and restricted database tables.
- An assignment policy - a policy that lists one or more members and a permission policy. The assignment determines the permitted operations to the listed members.
- keys directory (
!id_dir) - a directory that contains keys assigned to different members and are saved on the node. - pem directory (
!pem_dir) - a directory that contains certificates and their associated keys.
Prerequisites and reset
- A network with 2 operators
- A setup using a blockchain or a master node.
- No existing permissions and assignment policies.
- No existing keys assigned to nodes and users.
This document details how to configure a network using a master node.
If a blockchain is used, the master node configuration is ignored.
Use the following commands to configure each operator node:
set authentication off
Note that !ledger_conn is the ip:port of the master node
Use the following commands to configure the master node:
set authentication off
connect dbms sqlite !db_user !db_port blockchain
Use the following commands to delete all policies on a master node:
run client !ledger_conn "drop table ledger where dbms = blockchain"
run client !ledger_conn "create table ledger where dbms = blockchain"
run client !ledger_conn "blockchain delete local file"
Use the following command to delete the local blockchain file on each operator node:
blockchain delete local file
Use the following commands to delete existing issued keys on each node:
system del !id_dir/*.* /q      # Windows
system rm !id_dir/*.*          # linux
Validate policy structure
Policies are represented by JSON structures. The root of the JSON has one attribute and is considered the policy type.
When a variable is assigned with a policy, the policy info is presented on the CLI when the variable name is prefixed with
exclamation point (like: !member whereas “member” is the variable name).
The command json presents the policy on the CLI only if the policy is in correct JSON structure.
For example:
json !member
Adding the keyword test, returns true if the structure is correct, otherwise false is returned.
json !member test
Required attributes in each policy
The following chart summarizes the policies declared to authenticate users and validate their permissions.
| Policy Type | Role | Attribute | Required | Comments |
|---|---|---|---|---|
| member | Declares a member node or a user | type | Yes | Only a single policy can have the value root_ Multiple members can have _node or user as the value for the attribute type |
| public_key | Yes | Unique - multiple member policies with the same public key are not allowed | ||
| Permissions | Determines commands and databases allowed | name | Yes | A unique name assigned to the permissions policy |
| enable | Yes | A list with commands allowed, ‘*’ represents all commands | ||
| disable | No | An optional attribute to specify non-allowed commands | ||
| databases | No | An optional attribute to specify databases allowed | ||
| tables | No | An optional attribute to specify tables allowed | ||
| Assignment | Associates a permissions policy | permissions | Yes | The ID of the permissions policy |
| with one or more member policies | members | Yes | A list of the public keys of the assigned members | |
| public_key | Yes | The public key of the node or user creating the assignment policy | ||
| signature | Yes | The signature of the node or user creating assignment the policy |
Comments
This demo is executed on the CLI of the 2 operators.
- When a command is executed on operator 1 it is designated by CLI(opr.1).
- When a command is executed on operator 2 it is designated by CLI(opr.2).
- When a command is executed on operator 1 and 2 it is designated by CLI(opr.1.2).
- If a master
The demo steps
The demo is using 2 operator nodes and 2 users (root user and a non-root user). Each node and user is assigned with keys.
Each node and user is associated with member policies. Each member policy is assigned with permission policy such that
each node and member are associated with permissions. Relevant policies are signed such that it is possible to authenticate
the senders of messages and determine the permissions.
If a master node is used, the master node configuration is detailed below.
The following chart details the processes demonstrated:
| Step | Node | Process | Details |
|---|---|---|---|
| 1 | CLI(opr.1) | Root user keys | Generate keys for the root user |
| 2 | CLI(opr.1) | Root user policy | Create a policy for a root user, the root user grants permissions to members (nodes and users) |
| 3 | CLI(opr.1.2) | Node Keys | Generate keys to the operator nodes |
| 4 | CLI(opr.1.2) | Node member policy | Create member policies representing the operator nodes |
| 5 | CLI(opr.1) | User keys | Generate keys to a user which is not a node |
| 6 | CLI(opr.1) | User Policy | Create a member policy to the user |
| 7 | CLI(opr.1) | Permission Policy | Create a permission policy with no restrictions |
| 8 | CLI(opr.1) | Assign permissions to a user | Root user provides all privileges to a user |
| 9 | CLI(opr.1) | Permission policy | Generate a permission policy with limited privileges |
| 10 | CLI(opr.1) | Assign permissions to a node | A privileged user provides limited privileges to a node |
| 11 | CLI(opr.1.2) | Set a local password | The local password protects local data. This password is provided to the node every time the node restarts |
| 12 | CLI(opr.1.2) | Save the node’s private key | The node’s private key is saved locally and protected by the local password |
| 13 | CLI(opr.1.2) | Enable authentication | Enable authentication of messages from users and nodes |
(Optional) Step 0 - Connect to TPM
Follow the instructions in Connecting AnyLog to the Software TPM Initialize the tpm on operator 1, operator 2, and master. The example below assumes 3 software TPM docker containers are deployed.
Opr.1
tpm_port = 8001
tpm_ip = $INET_IP
tpm_base_url = !tpm_ip + : + !tpm_port
tpm set where conn = !tpm_base_url
Opr.2
tpm_port = 8002
tpm_ip = $INET_IP
tpm_base_url = !tpm_ip + : + !tpm_port
tpm set where conn = !tpm_base_url
master
tpm_port = 8003
tpm_ip = $INET_IP
tpm_base_url = !tpm_ip + : + !tpm_port
tpm set where conn = !tpm_base_url
Step 1 - Generate keys for the Root User
Opr.1
id create keys where password = abc and keys_file = root_keys
A file (named root_keys) with the public and encrypted private key is created in the keys’ directory (!key_dir).
These are the keys of the root user.
Note: If a file name is not specified, the keys would be presented on the monitor, and the
user is responsible to store and protect the keys.
Step 2 - Root user policy
This policy can include any information which is representative of the root user. The only required attributes are:
- type - with the value “root”
- public_key - with the public key of the root user. Note that the public key is added when the policy is signed (as in the example below).
In the example, we add a name (rachel) to the policy. It allows to reference the policy by the name, however, name is not a required attribute.
<member = {"member" : {
    "type" : "root",
    "name"  : "rachel"
    }
}>
If not using a TPM get the root private key from encrypted file
private_key = get private key where keys_file = root_keys
id sign !member where key = !private_key and password = abc
If using TPM, we just specify the root_key and password in the id sign call
id sign !member where key = root_keys and password = abc
Continue with the following commands
json !member    # View the policy including the signature and public key
blockchain insert where policy = !member and local = true  and master = !ledger_conn
Step 3 - Generate keys to nodes
Generate keys to the 2 operator nodes.
Use CLI(oper.1) to generates keys to operator #1:
id create keys for node where password = demo1
Use CLI(oper.2) to generates keys to operator #2:
id create keys for node where password = demo2
Step 4 - Create member policies to the operator nodes
Create a member policy to the 2 operator nodes.
Use CLI(oper.1) to create the member policy of operator #1:
<member = {"member" : {
    "id"   : "node_001",
    "type" : "node",
    "company"  : "Northern Light",
    "name" : "server south"
    }
}>
# If TPM not enabled
id sign !member where password = demo1
# If TPM enabled
id sign !member where key = node and password = demo1

json !member
blockchain insert where policy = !member and local = true  and master = !ledger_conn
Use CLI(oper.2) to create the member policy of operator #2:
<member = {"member" : {
    "id"   : "node_002",
    "type" : "node",
    "company"  : "Northern Light",
    "name" : "server north"
    }
}>
# If TPM not enabled
id sign !member where password = demo2
# If TPM enabled
id sign !member where key = node and password = demo2

json !member
blockchain insert where policy = !member and local = true  and master = !ledger_conn
Step 5 - Generate keys to a user
Use CLI(oper.1) to generate keys for a user named Roy. The keys are stored in keys directory:
id create keys where password = 123 and keys_file = roy
Step 6 - Create a member policy to the user
Use CLI(oper.1) to create a member policy for a user named roy.
Notes:
1) The policy type is user to differentiate from the type root (that identifies the policy of the root member).
2) The public key is added to the policy when the policy is signed. No 2 members policies with the same public key is allowed.
<member = {"member" : {
    "id"   : "user_001",
    "type" : "user",
    "name"  : "roy"
    }
}>
# If TPM not enabled
private_key = get private key where keys_file = roy
id sign !member where key = !private_key and password = 123
# If TPM enabled
id sign !member where key = roy and password = 123

!member
blockchain insert where policy = !member and local = true  and master = !ledger_conn
Step 7 - Create a permission policy with no restrictions
Use CLI(oper.1) to create a permission policy that has no restrictions.
This policy enables all commands and allows to operate with all databases.
It must be signed by the root_key.
<permissions = {"permissions" : {
    "name" : "no restrictions",
    "databases" : ["*"],
    "enable" : ["*"]
    }
}>
If TPM not enabled
private_key = get private key where keys_file = root_keys
id sign !permissions where key = !private_key and password = abc
If TPM enabled
id sign !permissions where key = root_keys and password = abc
blockchain insert where policy = !permissions and local = true and master = !ledger_conn
Step 8 - Assign privileges to a user
Use CLI(oper.1) - the root user provides all privileges to Roy by associating the “no restriction” policy to tne member Roy.
The assignment process and assignment policy are detailed below:
permission_id = blockchain get permissions where name = "no restrictions" bring ['permissions']['id']
member_user = blockchain get member where name = roy bring ['member']['public_key']

<assignment = {"assignment" : {
        "name" : "assignment to no restrictions",
        "permissions"  : !permission_id,
        "members"  : [!member_user]
        }
}>
# If TPM not enabled
private_key = get private key where keys_file = root_keys
id sign !assignment where key = !private_key and password = abc
# If TPM enabled
id sign !assignment where key = root_keys and password = abc

json !assignment
blockchain insert where policy = !assignment and local = true  and master = !ledger_conn
Notes: 1) The assignment policy needs to be signed by the root user or a user with permissions to sign assignment policies. 2) After the assignments, as Roy is assigned to a no restriction policy, Roy is permitted to sign assignments policies.
Step 9 - Create a permission policy with limited permissions
Use CLI(oper.1) to generate a permission policy with limited privileges.
<permissions = {"permissions" : {
    "name" : "node basic permissions",
    "databases" : ["*", "-lsl_demo"],
    "tables" : ["lsl_demo.temperature_sensor", "lsl_demo.ping_sensor"],
    "enable" : [ "file", "get", "reset", "sql", "echo", "print", "blockchain"],
    "disable" : ["get node id"]
    }
}>
# If TPM not enabled
private_key = get private key where keys_file = roy
id sign !permissions where key = !private_key and password = 123
# If TPM is enabled
id sign !permissions where key = roy and password = 123

json !permissions
blockchain insert where policy = !permissions and local = true  and master = !ledger_conn
Notes:
1) The policy example permits operating on all databases except a database called lsl_demo.
2) The tables attribute permits 2 tables (temperature_sensor and ping_sensor) in lsl_demo database.
3) The derived data permission is as follows: the permission allows operating on all databases, however, only table temperature_sensor and tables ping_sensor are allowed in database lsl_demo.
4) The attribute enable lists the anylog commands which are permitted.
5) The attribute disable lists the AnyLog commands which are not allowed.
Step 10 - Assign limited privileges to nodes
Use CLI(oper.1) - a user with privileges to assign permissions, provides limited permissions to the operator nodes. In the example below, roy assign the policy named node basic permissions to the 2 operator nodes:
member_node1 = blockchain get member where id = node_001 bring ['member']['public_key']
member_node2 = blockchain get member where id = node_002 bring ['member']['public_key']

permission_id =  blockchain get permissions where name = "node basic permissions" bring ['permissions']['id']

<assignment = {"assignment" : {
        "permissions"  : !permission_id,
        "members"  : [!member_node1, !member_node2]
        }
}>
# If TPM not enabled
private_key = get private key where keys_file = roy
id sign !assignment where key = !private_key and password = 123
# If TPM enabled
id sign !assignment where key = roy and password = 123

json !assignment
blockchain insert where policy = !assignment and local = true  and master = !ledger_conn
Step 11 - Provide the local password
The local password protects sensitive info on each node and is provided whenever the node restarts.
In this demo, each node’s private key is stored locally and protected by the local password.
In the example below, the password 123 is assigned to operator 1 and 456 is assigned to operator 2.
On CLI(oper.1):
set local password = 123
On CLI(oper.2):
set local password = 456
Note:
- [for file-based key management] If a local password exists, an error is returned if the nodes restarts, and the node is provided with incorrect password.
- [for file-based key management] If the local password is lost, all the relevant files in the keys directory needs to be deleted, and the node needs to be assigned with new keys and a new assignment policy.
- [for tpm-based key management] If password is forgotten to each key, then delete the node key from the tpm shared directory and generate a new node key.
Step 12 - Save the node’s private key
Only if file-based key management
The private key can be stored on the node and protected using the local password.
The following examples stores the private key on each node:
On CLI(oper.1): Only if file-based key management
set private password = demo1 in file
On CLI(oper.2): Only if file-based key management
set private password = demo2 in file
Note: The key is stored in a file called auth.id in keys directory.
Step 13 - Enable authentication
Enable, on each node a process to authenticate the senders of messages and determine the relevant authorization.
When a node receives a message, the message is signed by the private key of the sender (the key of tje node or the user sending the message).
The receiving node will first use the public key of the sender to authenticate the sender. Next it will consider the permission
policies to determine that the sender is authorized to the type of message received. Authorization is determined if it
is granted by the root user, or by a user which is in a chain of permitted authorizations that is derived from the root user.
Enable authentication on each node using the following command:
On CLI(oper.1.2):
set node authentication on
Note: If master node is used, enable authentication on the nodes after the setup of the master node.
Master Node Configuration
This setup is optional (if a master node is used).
CLI(master) designates the master node command line.
Generate keys for the Master Node
On CLI(master)
id create keys for node where password = masterpswd
Master node policy
On CLI(master)
<member = {"member" : {
    "type" : "node",
    "name"  : "master_node"
    }
}>
# If TPM not enabled
id sign !member where password = masterpswd
# If TPM enabled
id sign !member where key = node and password = masterpswd

json !member    # View the policy including the signature and public key
blockchain insert where policy = !member and local = true  and master = !ledger_conn
Create a permission policy for the master node
On CLI(opr.1)
<permissions = {"permissions" : {
    "name" : "master node permissions",
    "enable" : [ "file", "event", "echo", "print"]
    }
}>
# If TPM not enabled
private_key = get private key where keys_file = roy
id sign !permissions where key = !private_key and password = 123
# If TPM enabled
id sign !permissions where key = roy and password = 123

json !permissions
blockchain insert where policy = !permissions and local = true  and master = !ledger_conn
Assign privileges to the master node
On CLI(oper.1)
permission_id = blockchain get permissions where name = "master node permissions" bring ['permissions']['id']
member_node = blockchain get member where name = master_node bring ['member']['public_key']

<assignment = {"assignment" : {
        "name" : "master assignment",
        "permissions"  : !permission_id,
        "members"  : [!member_node]
        }
}>
# If TPM not enabled
private_key = get private key where keys_file = roy
id sign !assignment where key = !private_key and password = 123
# If TPM enabled
id sign !assignment where key = roy and password = 123

json !assignment
blockchain insert where policy = !assignment and local = true  and master = !ledger_conn
Provide the local password
On CLI(master):
set local password = masterlocpsswd
Save the master node private key
On CLI(master):
set private password = masterpswd in file
Enable authentication
On CLI(master):
set node authentication on
Demo authorized and non-authorized commands
Get the address of each operator: On CLI(oper.1):
AL +> get connections
Type      External Address  Local Address
---------|-----------------|--------------|
TCP      |73.222.38.13:7848|10.0.0.78:7848|
REST     |10.0.0.78:7849   |10.0.0.78:7849|
Messaging|73.222.38.13:7850|10.0.0.78:7850|
On CLI(oper.2):
AL +> get connections
Type      External Address  Local Address
---------|-----------------|--------------|
TCP      |73.222.38.13:3048|10.0.0.78:3048|
REST     |10.0.0.78:3049   |10.0.0.78:3049|
Messaging|73.222.38.13:7855|10.0.0.78:7855|
Examples permitted messages
On CLI(oper.1):
 run client 10.0.0.78:3048 get status
 run client 10.0.0.78:3048 echo 'hello world'
 run client 10.0.0.78:3048 get status
 run client 10.0.0.78:3048 get databases
On CLI(oper.2):
 run client 10.0.0.78:7848 get status
 run client 10.0.0.78:7848 echo 'hello world'
 run client 10.0.0.78:7848 get status
 run client 10.0.0.78:7848 get databases
Examples denied messages
On CLI(oper.1):
 run client 10.0.0.78:3048 system ls
 run client 10.0.0.78:3048 set authentication off
On CLI(oper.2):
 run client 10.0.0.78:7848 system ls
 run client 10.0.0.78:7848 set authentication off
Messaging using the private key of a user
A user may want to send a messages using his authorization.
For example, an administrator logins to a node and needs to issue a query, or a command which is not permitted by
the permission policy assigned to the node.
The user can leverage his assigned permissions as in the example below:
private_key = get private key where keys_file = roy
set signatory where key = !private_key and password = 123  and name = roy
get signatory   # Validate signatory change from the node to the user
run client 10.0.0.78:3048 system ls     # Roy has no restrictions and the command will be executed
Using certificates
This process makes AnyLog a Certificate Authority (CA) that issues Client Certificates to 3rd parties applications.
This process id detailed in the Using SSL Certificates section.
Client Certificates enable the following:
- Only clients holding certificates can communicate with the network nodes.
- A message from a holder of a certificate includes a public key. The public key is treated like a member of the network such that:
- The private key is represented by a member policy (and the type attribute is with the value certificate).
- Using an assignment policy, the member policy is associated with a permission policy.
- A message from a 3rd party to a node in the network is processed if the sender is authenticated and is with proper permissions.
Notes: This setup allows Secure Socket Layer (SSL) between a server (AnyLog Node) and a client (the 3rd party application). Below is an example of the Server Side (AnyLog) REST sockets configuration to allow SSL Certificates:
run rest server !ip !rest_port where timeout = 0 and threads = 6 and ssl = true and ca_org = AnyLog and server_org = "Node 128"
Use the following command to determine how the AnyLog Node is configured to allow SSL:
get rest server info
Example
The following example assumes that the example certificates detailed in the Using SSL Certificates section are available in the pem directory (!pem_dir).
Generate a Member Policy representing the issued certificate:
public_key = get public string where keys_file = !pem_dir/server-acme-inc-public-key

<member = {"member" : {
    "type" : "certificate",
    "name"  : "acme",
    "public_key" : !public_key
    }
}>

# No need to sign this policy
blockchain insert where policy = !member and local = true  and master = !ledger_conn
Generate a Permission Policy for 3rd patties applications:
<permissions = {"permissions" : {
    "name" : "application basic permissions",
    "tables" : ["lsl_demo.temperature_sensor", "lsl_demo.ping_sensor"],
    "enable" : [ "file", "get", "reset", "sql", "echo", "print", "blockchain"],
    }
}>
private_key = get private key where keys_file = roy
id sign !permissions where key = !private_key and password = 123
json !permissions
blockchain insert where policy = !permissions and local = true  and master = !ledger_conn
Assign the Permission Policy to the Member Policy
member_certificate = blockchain get member where type = certificate and name = acme bring ['member']['public_key']

permission_id = blockchain get permissions where name = "application basic permissions" bring [permissions][id]

<assignment = {"assignment" : {
        "permissions"  : !permission_id,
        "members"  : [!member_certificate]
        }
}>
private_key = get private key where keys_file = roy
id sign !assignment where key = !private_key and password = 123
json !assignment
blockchain insert where policy = !assignment and local = true  and master = !ledger_conn
Query permissions by a public
public_key = get public key where keys_file = !pem_dir/server-acme-inc-public-key
get permissions for member !public_key
Example of a third part application - cURL
curl --location --request GET https://10.0.0.78:7849 \
  --header "User-Agent: AnyLog/1.23" \
  --header "command: get status" \
  --cert "server-acme-inc-private-key.crt" \
  --key "server-acme-inc-private-key.key"
Example of a third part application - AnyLog Remote CLI
Use the Setting Tab to configure the REST calls as follows:
- Enable CA Certificate
- Update PEM file to use:
ca-anylog-public-key.crt - Update CRT file to use:
server-acme-inc-public-key.crt - Update KEY file to use:
server-acme-inc-private-key.key
Example of a third part application - Grafana
Note: Configuring Grafana is detailed in the Using Grafana section.
To use Certificate, update the Grafana JSON data source page as follows:
- Update the AnyLog URL to use HTTPS (Encrypted Connection).
- Set TLS Client Auth to ON
- Set Skip TLS Verify to ON
- In the TLS/SSL Auth Details section:
- Update the Client Cert with the content of the
server-acme-inc-public-key.crtfile. - Update the Client Key with the content of the
server-acme-inc-private-key.keyfile.
- Update the Client Cert with the content of the
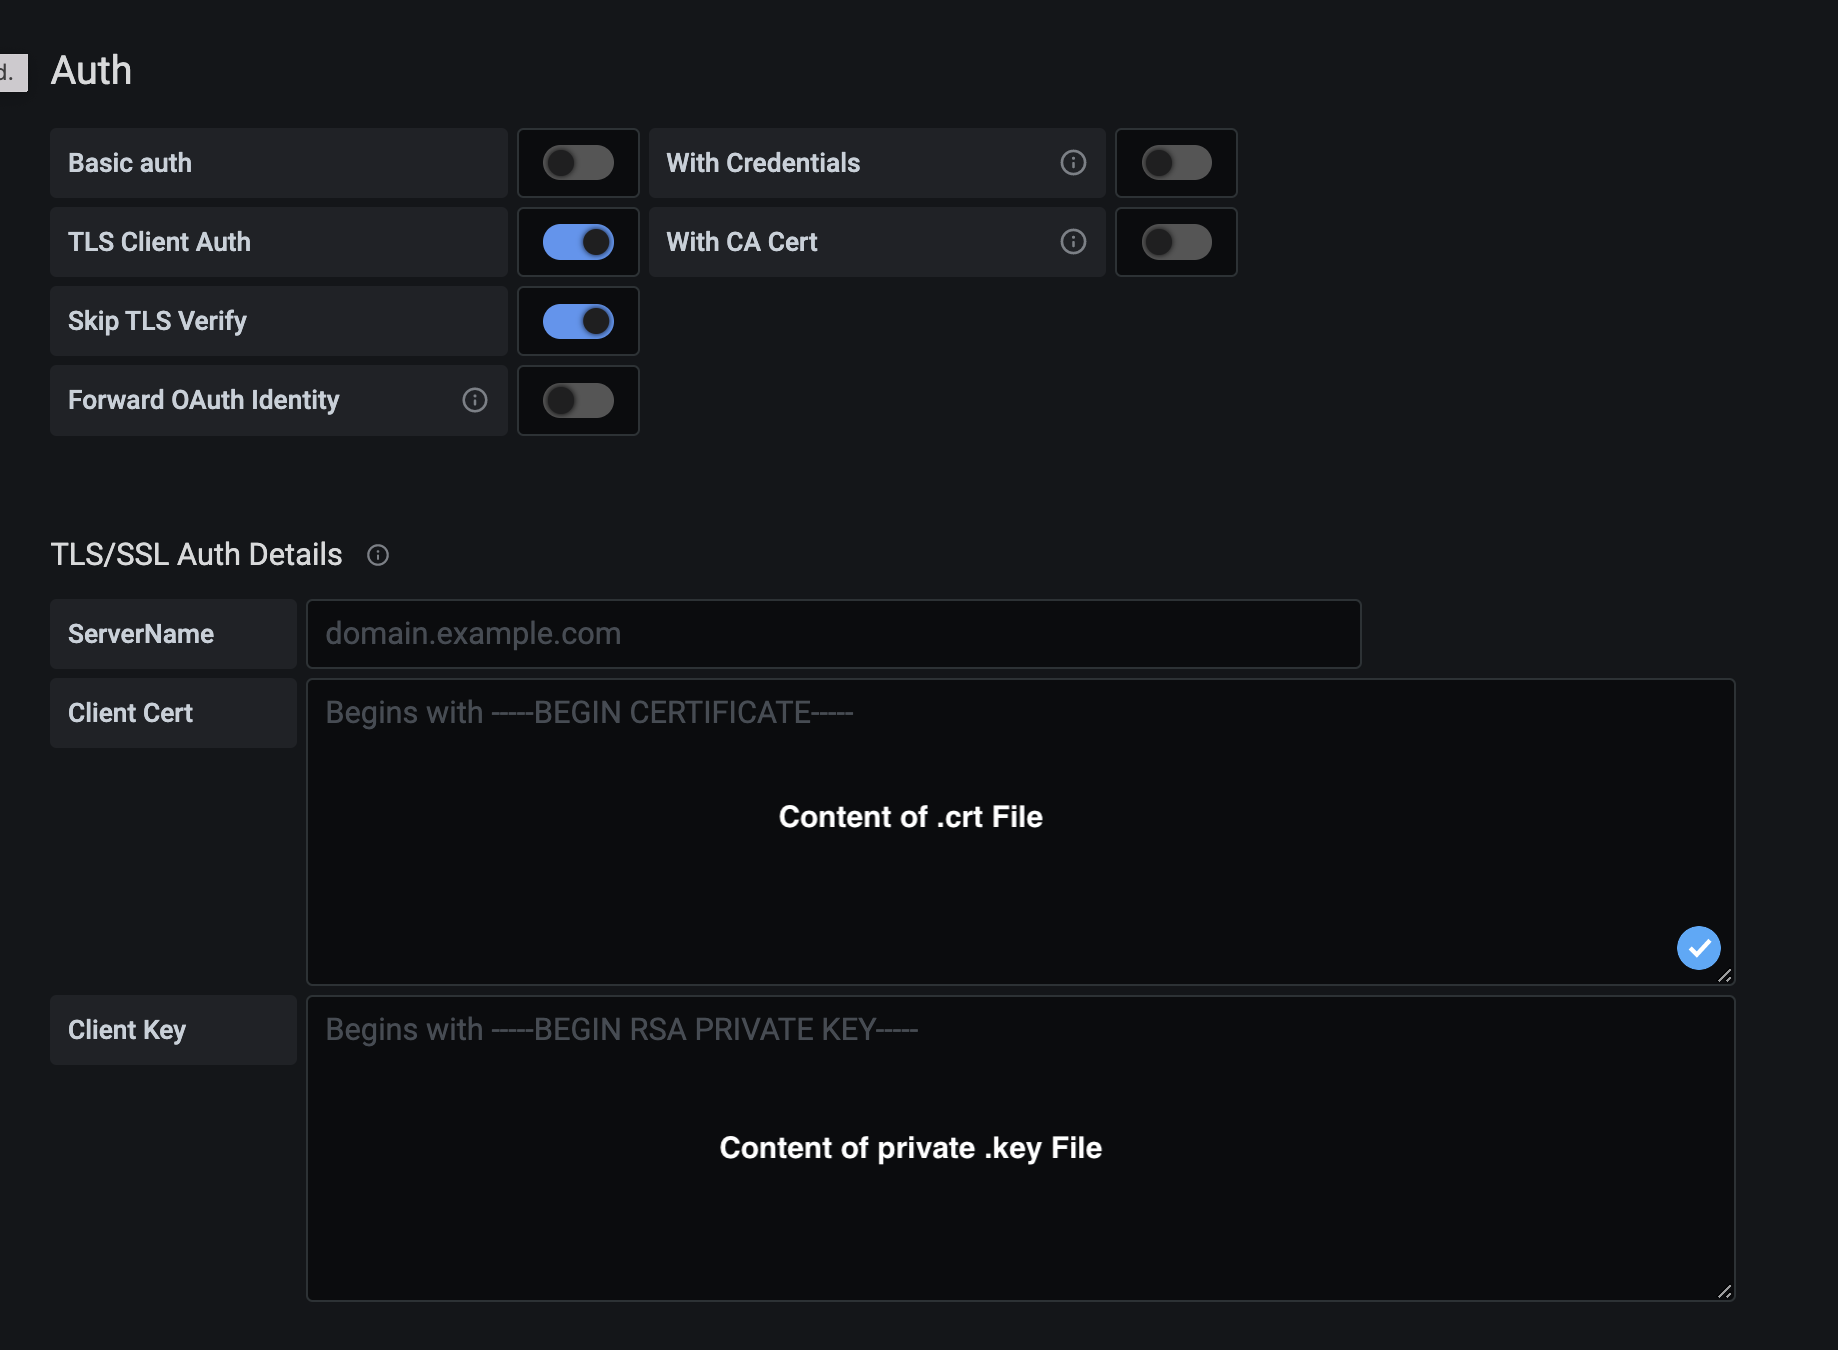
With this setup, Save & Test needs to return a green message with the text: Data Source is working.